Authorize with Hosted Link
Choose how to integrate Hosted Link into your authorization flow
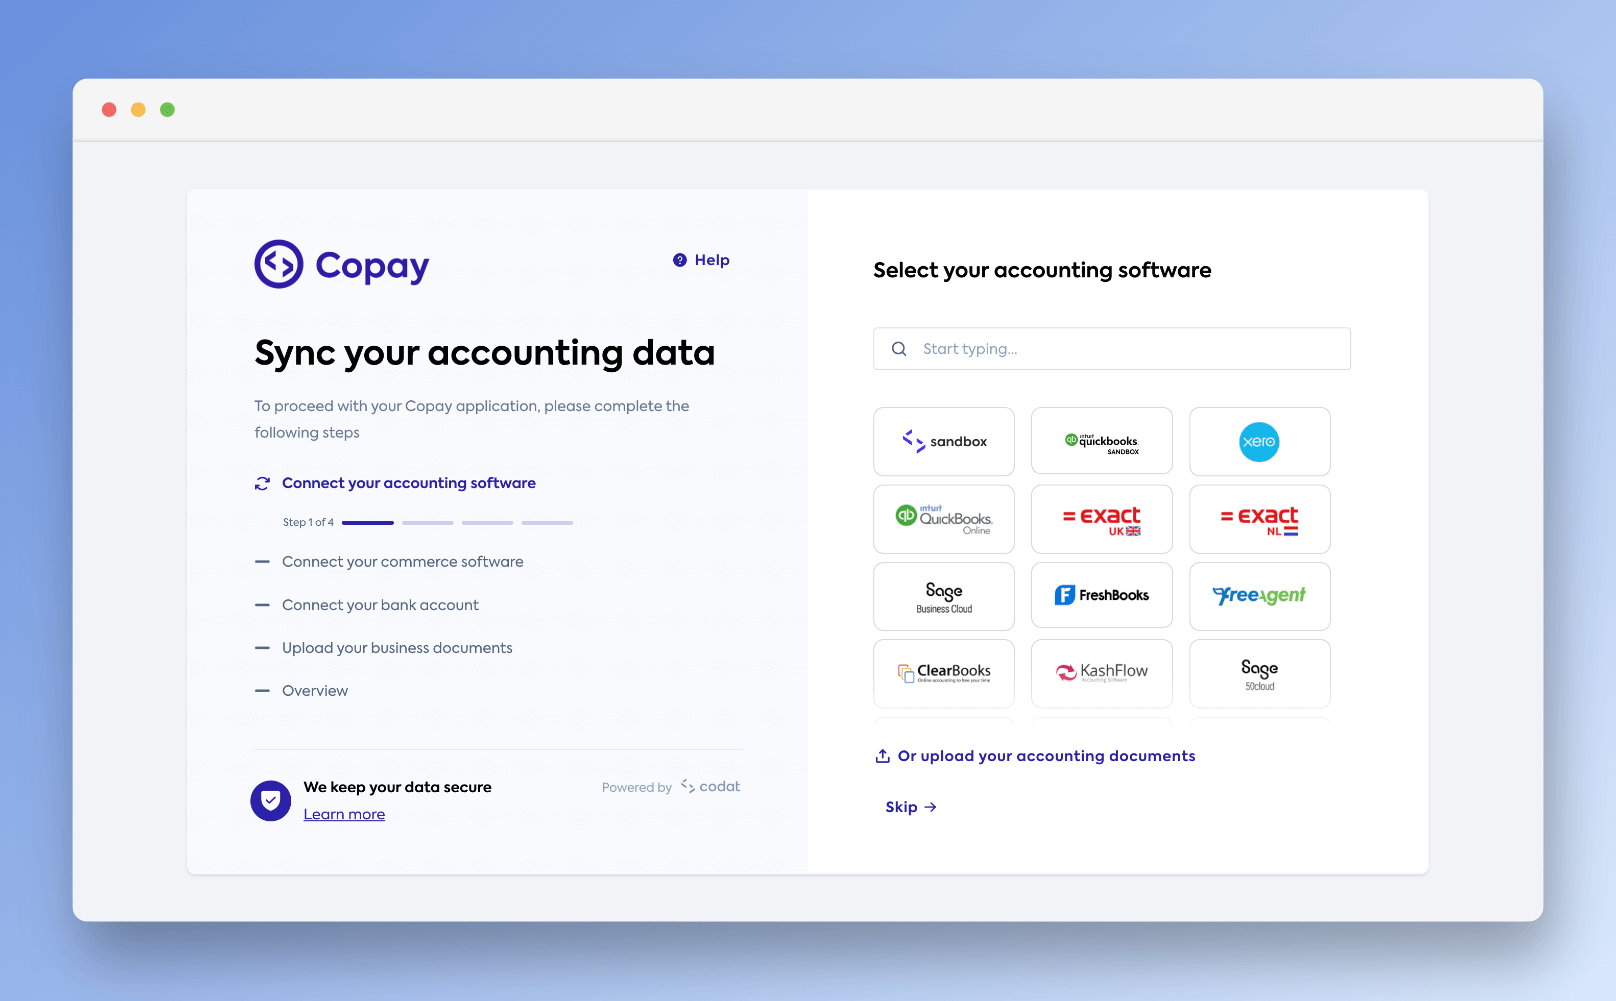
With Hosted Link, you can choose how you want your customers to start their authorization journey while benefitting from an out-of-the-box solution built, provided, and hosted by Codat.
To connect your customers' financial software, you can:
- integrate the Hosted Link auth flow into the user interface of your existing app, or
- initiate the authorization journey by sharing your Hosted Link URL.
Integrate the Hosted Link flow into your app
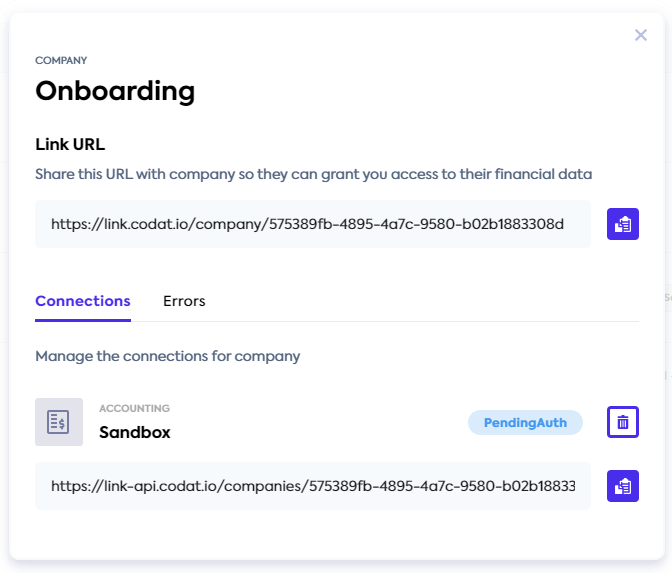
- First, you need to create a Codat company for your SMB. We recommend doing that simultaneously as your SMB user signs up within your app. That allows you to track their connection status from day one. To create a company, follow the steps in Managing companies.
We recommend that you populate the name value with the ID that you use for the merchant in your internal system so that it’s easier to identify the Codat company that corresponds to your record of the merchant.
- From the response to the request, retain the following parameters:
companyId, because you will need it for directing your customers to Link and managing their connections;redirectURL value, because you will use this URL in your app to direct the customer to start their Link journey.
Once your customer finishes the Link flow, they will be redirected back to the URL you have set in the Link settings. You can also present your customer with a confirmation screen that shows the integrations they have set up.
Review the parameters in the example response to creating a new company:
{
  // companyId - retain this
  "id": "1126743b-113d-4d72-b14f-36d6742df487",
  "name": "Superapp",
  "platform": "",
  // redirect - use to redirect your customer to Hosted Link
  "redirect": "https://link.codat.io/company/1126743b-113d-4d72-b14f-36d6742df487",
  "dataConnections": [],
  "created": "2022-05-16T14:55:21.6076495Z"
}
To enhance your Hosted Link experience, set up a webhook to monitor the connection status of the newly created company. We recommend that you set up a webhook for when a user authorizes a data connection so that you can action it within your app.
redirect Link URL for existing customersEnsure to direct the existing customers to the redirect Link URL that you can retrieve from the company's metadata. If you create a new company and establish a new connection for a customer previously connected, you may be billed for it based on your contract.
Managing existing users with active connections
Direct the user to the redirect URL that can be retrieved from a company's metadata. This allows them to modify their connections via the Hosted Link UI.
Managing existing users with pending connections
When a user creates a data connection, but fails to authorize access to their financial platform, a data connection is created in a pending status in the respective Codat company.
In this scenario, allow your user to authorize this connection by sending them directly to the third-party authentication screen. Use the linkUrl value from the dataConnections array in the company's metadata. This will prompt the user to authorize the connection to their financial platform.
Initiate the Hosted Link journey
Use the Hosted Link URL
Use the Hosted Link URL if your customer connection is meant to be persistent, and your customer may need to view or update their connection in the future.
If this is a new user:
- Create a company via Portal for your customer.
- Navigate to the Companies page in Portal.
- Find the company that you created for the customer, and click Request data next to the company name.
- Copy the Link URL from the box that appears and share it with the customer. This will allow the customer to create and authorize a data connection.
If a user already has an integration connection that hasn't been authorized and is not in an active state, click the integration name and copy the URL from the Connections section instead of the Link URL. Share this link with the user to allow them to authorize the specific connection.
Use the Invite company URL
If you want to onboard a large number of new companies without needing to specify company names or references, AND your company and your customer do not need to manage, view, or update connections in the future, use the Invite company URL:
- Sign in to the Codat portal and navigate to the Companies page.
- Click on the
Invite companybutton and copy the URL that displays to share it with your customer. Before sharing, ensure that the page title and body text are correctly configured as per Link customization settings.
Using the Invite company URL will not allow your customer to view, update or add new connections against the existing Codat company which represents your customer. Therefore, you should use the Link URL to manage connections for existing customers.
💡 Tips and traps
- Hosted Link is not compatible with iframes. This is against our security policies and will not work. If you want to embed link inside your website, try our Embedded Link solution.
- Some users may be concerned sharing their data at a
codat.iodomain. You should consider pre-warning them that they about to visit a third party website for the authorization process, or try our Embedded Link solution.